Minisforum N5 NAS Adventures
I recently rebuilt my home server with a specific goal: Combine the raw speed of enterprise NVMe storage with the massive capacity of spinning rust, without the overhead of a heavy VM like TrueNAS.
The result is a Proxmox-based setup that serves VMs at lightning speed while acting as a 40TB+ NAS for my Mac and Windows clients. Here is exactly how I built it.
The Hardware Strategy
The problem with most home servers is the tradeoff: HDDs are cheap but slow at random I/O (like browsing folders or running backups), while NVMe is fast but expensive for bulk storage.
My solution? Hybrid ZFS.
- Compute/Cache: 2x 2TB Enterprise U.2 NVMe (Intel SSDPE2KX020T7)
- Bulk Storage: 3x 20TB Enterprise HDDs (Seagate Exos)
- Boot: 1x 256GB M.2 SSD
The Chassis: Minisforum N5 Pro
The foundation of this build is the Minisforum N5 Pro, a compact NAS chassis built around an AMD Ryzen AI 9 HX PRO 370 processor. This little powerhouse features 5 hot-swap SATA bays (supporting up to 144TB total), dual network ports (10GbE + 5GbE), and dedicated U.2/M.2 slots for NVMe storage.
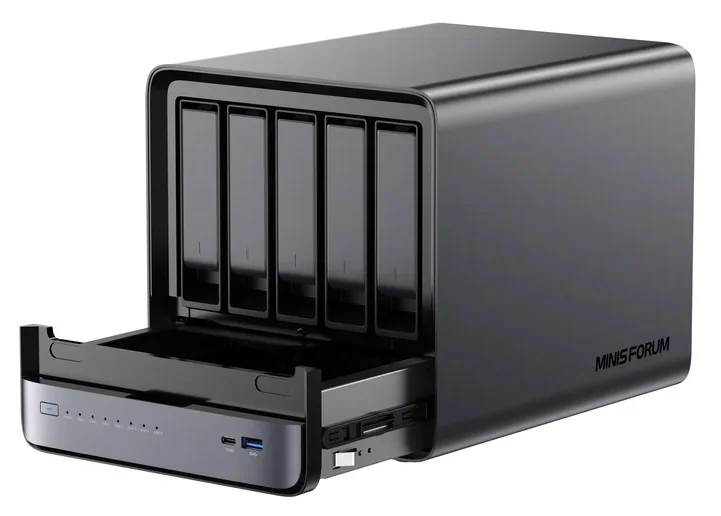
What makes this chassis perfect for a hybrid ZFS setup is the separation of storage interfaces: The five 3.5" bays handle the bulk HDDs, while the dedicated NVMe slots (accessible via the two U.2 bays and one M.2 slot) provide the fast tier without adapter juggling. The dual 10GbE/5GbE NICs are ideal for bonding or separating management/storage traffic, and the compact form factor fits more storage density than most commercial NAS units twice its size.
Instead of using the NVMe drives just for VMs, I partitioned them to act as "Accelerators" for the HDD array using ZFS Special VDEVs. This means all metadata (file listings) and small files live on the NVMe, while large files (movies, ISOs) live on the HDDs.
Step 1: The ZFS Partition Layout
Proxmox usually wants to take a whole disk, but to get the most out of the U.2 drives, I manually partitioned them into three slices:
- 16GB SLOG (ZIL): Accelerates synchronous writes (databases/NFS).
- 256GB Special VDEV: Stores all metadata and small files (<32K) for the HDD pool.
- ~1.7TB VM Pool: Fast storage dedicated to VM boot disks.
The Commands
I used sgdisk to carve up the NVMe drives (nvme1n1 and nvme2n1):
# 1. Create partitions (SLOG, Special, VM)
sgdisk -n 1:0:+16G   -t 1:BF01 -c 1:"slog"    /dev/nvme1n1
sgdisk -n 2:0:+256G  -t 2:BF01 -c 2:"special" /dev/nvme1n1
sgdisk -n 3:0:0      -t 3:BF01 -c 3:"vmpool"  /dev/nvme1n1

# 2. Clone layout to second drive
sgdisk -R /dev/nvme2n1 /dev/nvme1n1
sgdisk -G /dev/nvme2n1
Then I created the pools. Note the use of RaidZ1 for the HDDs and Mirrors for the NVMe partitions.
# Create the Fast VM Pool (Mirror)
zpool create -o ashift=12 tank-fast mirror /dev/nvme1n1p3 /dev/nvme2n1p3

# Create the Bulk HDD Pool (RaidZ1)
zpool create -o ashift=12 tank-bulk raidz1 /dev/sda /dev/sdb /dev/sdc

# Add the Accelerators (Must be mirrored!)
zpool add tank-bulk special mirror /dev/nvme1n1p2 /dev/nvme2n1p2
zpool add tank-bulk log mirror /dev/nvme1n1p1 /dev/nvme2n1p1
Finally, the "Magic Tuning" to force small files onto the SSDs:
# Anything smaller than 32K bypasses the HDDs entirely
zfs set special_small_blocks=32K tank-bulk
zfs set compression=lz4 tank-bulk
zfs set atime=off tank-bulk
Step 2: The "NAS" Container (LXC)
Instead of passing these drives into a heavy VM, I used a lightweight Debian 12 LXC Container to serve files. This allows the NAS to run with near-zero overhead while accessing the ZFS datasets directly via "Bind Mounts."
Container Setup
- Template: Debian 12 (Bookworm)
- Privileged: Yes (Makes SMB/NFS permissions much easier)
- Features: Enabled Nesting (for Cockpit) and NFS (for file sharing).
The Bind Mounts
I edited the container config (/etc/pve/lxc/100.conf) on the host to pass the storage through:
mp0: /tank-bulk/general,mp=/mnt/general
mp1: /tank-bulk/media,mp=/mnt/media
mp2: /tank-bulk/timemachine,mp=/mnt/timemachine
Step 3: Management with Cockpit & 45Drives
To manage users and shares without touching config files, I installed Cockpit with the excellent plugins from 45Drives.
Inside the container:
# Update and install dependencies
apt update && apt install -y curl wget samba winbind

# Install Cockpit (The Web UI)
apt install -y cockpit

# Install 45Drives Identities (User Manager)
wget https://github.com/45Drives/cockpit-identities/releases/download/v0.1.12/cockpit-identities_0.1.12-1focal_all.deb
apt install -y ./cockpit-identities_0.1.12-1focal_all.deb

# Install 45Drives File Sharing (SMB Manager)
wget https://github.com/45Drives/cockpit-file-sharing/releases/download/v3.3.4/cockpit-file-sharing_3.3.4-1focal_all.deb
apt install -y ./cockpit-file-sharing_3.3.4-1focal_all.deb

# Remove the downloaded files
rm *.deb
This gives me a beautiful web UI to create users, manage SMB shares, and check permissions.
Step 4: The Time Machine Configuration
Backing up Macs to a NAS can be tricky. I separated my backups into a dedicated ZFS dataset (tank-bulk/timemachine) to apply two critical limits:
-
ZFS Quota (Physical Limit):
zfs set quota=3T tank-bulk/timemachine. This stops the backup from filling the whole NAS. -
Samba "Fruit" Limit (Logical Limit): In Cockpit, I added this to the share configuration so macOS sees a 3TB drive instead of a 40TB one:
vfs objects = catia fruit streams_xattr
fruit:time machine = yes
fruit:time machine max size = 3T
Step 5: Perfect Discovery with Avahi
This is the final piece to make your NAS feel "native" on Mac and Windows. While Samba can broadcast itself, it's often unreliable in containers. The industry standard is to run Avahi Daemon (Linux's Bonjour) separately.
Install and Configure Avahi
First, install the daemon and disable Samba's conflicting mDNS:
# Install Avahi
apt update && apt install -y avahi-daemon

# Disable Samba's built-in mDNS (prevents duplicates in Finder)
echo "multicast dns register = no" >> /etc/samba/smb.conf
systemctl restart smbd
Create the mDNS Service File
This XML file advertises your server as a Time Capsule with a dedicated backup volume:
nano /etc/avahi/services/samba.service<?xml version="1.0" standalone='no'?>
<!DOCTYPE service-group SYSTEM "avahi-service.dtd">
<service-group>
<name replace-wildcards="yes">%h</name>
<!-- SMB File Server -->
<service>
<type>_smb._tcp</type>
<port>445</port>
</service>
<!-- Device Type (Time Capsule Icon) -->
<service>
<type>_device-info._tcp</type>
<port>0</port>
<txt-record>model=TimeCapsule8,119</txt-record>
</service>
<!-- Time Machine Volume Advertisement -->
<service>
<type>_adisk._tcp</type>
<port>9</port>
<txt-record>sys=waMa=0,adVF=0x100</txt-record>
<txt-record>dk0=adVN=TimeMachine,adVF=0x82</txt-record>
</service>
</service-group>Critical: The adVN=TimeMachine value must match your share name exactly.
Finally, restart the services:
systemctl restart avahi-daemonVerification
- macOS: Open Finder - you should see your NAS with a Time Capsule icon. In System Settings > Time Machine, the share appears automatically.
- Windows: Open File Explorer > Network - your NAS shows up under "Computers."
For a deep dive into the _adisk and _device-info records, see this excellent video.
The Result
- Performance: Directory listings are instant because metadata lives on NVMe.
- Throughput: I saturate my 10GbE network easily.
- Maintenance: My drives use stable
/dev/disk/by-idnames, making the setup reboot-proof.
It's the best of both worlds: The power of ZFS command-line flexibility with the ease of use of a GUI for day-to-day management.